pop up description layer
HOME
Cryptozoology UFO Mysteries Aviation Space & Time Dinosaurs Geology Archaeology Exploration 7 Wonders Surprising Science Troubled History Library Laboratory Attic Theater Store Index/Site Map Cyclorama
Search the Site:
|


|
x
Supplies: Several large boxes made of corrugated cardboard, a hot glue gun, pencil, folding rule, a knife sharp enough to slice the cardboard and a heavy, long straight object that you can use to make bends in the cardboard. A straight board two or three feet long will do. The larger and flatter the cardboard is the better results you will get.
Turning the boxes into sheet cardboard. STEP 1: If you have any cardboard boxes to use, first turn them into flat sheets of cardboard. To do this open up the top and the bottom of the box. Remove any tape necessary. Find the seam where the cardboard was stapled or glued together to form the sides of the box. Cut that seam and lay the cardboard out flat. It will probably look like a sheet with large flaps hanging off the sides. STEP 2: You will need at least two sheets of unbroken cardboard slightly larger than the mummy you've made to build the front and back of the case. Set aside the smoothest sheet for the lid, but make sure that the sheet is at least as high and three inches wider than your mummy. You will use the other sheet for the back of the coffin. STEP 3: You will need to decide what shape your mummy case will be. Look at the diagram below for some ideas. Making the coffin's back-piece. STEP 4: Lay your mummy down on the sheet of cardboard leaving at least 3/4" of between the mummy and any edges. Take a pencil and trace the shape of the mummy onto the cardboard. Follow the shape of the mummy at its widest point, not just where it touches the cardboard. When you are done, remove the mummy. STEP 5: Use your ruler to draw a center line running up the middle tracing of the mummy from head to foot.
STEP 7: Use the ruler to measure the distance from the centerline to the line you just drew on the left side at several different levels (head, shoulders, torso, hips, legs, feet, etc.) and mark a point the same distance from the centerline toward the right side of the mummy.
STEP 9: Check to make sure that both lines are outside the mummy trace. Make adjustments if they are not, but try to keep each side symmetric. STEP 10: When you are sure that the back-piece is larger than your mummy, use your knife to cut the back-piece of the coffin out. Making the coffin sides. STEP 11: Measure the depth of your mummy. It will probably be around 12". You will need to cut sides for the mummy case that are at least as deep as the mummy plus 2-1/2 inches. If your mummy is 12" deep, cut your coffin sides 14-1/2 inches deep. The final 2-1/2 inches will be folded over to make a tab you can hot glue to the back-piece of the coffin.
STEP 10: Once the side is cut out, warm up your glue gun. You are going to attach the side of the coffin to the back by bending the tab at a right angle to the side and then using the gun to glue it to the back-piece. Along the curved section of the back you will need to cut "V" shaped pieces out of the tab in order to keep the tab from buckling as you bend the side piece. Check the diagram. STEP 11: Once you have one section of the side of the coffin glued down, cut another side using the same technique as you did above. You can attach the new side to the old by cutting an inch or so off the tab on the new piece and overlapping the sides. Glue the overlapped section together. STEP 12: When you have gone all around the coffin back connect the last section of the side to the first with the overlap technique you used earlier. You now have your mummy case with the exception of its lid.
STEP 13: Make the mummy lid by first laying the mummy case onto a sheet of flat cardboard. Trace the shape of the case onto the cardboard adding an extra 1/2 inch all around so you are sure that the lid will fit over the case. The bottom of the lid can be three and one half inches shorter than the case as we will be fabricating a special "foot" section for the bottom. Cut out the mummy case lid. STEP 14: Make the edge of the lid with exactly the same technique you used to make the sides of the coffin. In this case, though the edge of the lid should be 2 inches deep, not the 12 inches or so you needed for the sides of the coffin. Do not put an edge on the very bottom of the lid. STEP 15: Now you are going to make the "foot" of the mummy lid. Examine the diagram. Copy the layout onto a sheet of cardboard. Note that you will have to make the width dependent on the width of your mummy lid. Cut on the solid lines and fold on the dashed lines as shown. Fold the "foot" as shown and glue it together with hot glue. Then hot glue the "foot" to the lid as shown. NOTES: Your basic coffin and lid should be complete and your mummy should fit nicely inside. Next you will want to decorate your mummy case. NEXT SECTION: Decorating the mummy case.
Copyright Lee Krystek 2001. All Rights Reserved. |
 Building
the Mummy Case:
Building
the Mummy Case: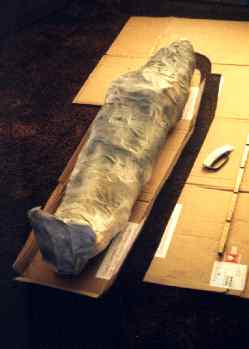 You
will be making the mummy case by using large sheets of corrugated
cardboard. First you cut out the back of the case, then the
sides. You will be attaching the sides to the back with a hot
glue gun. When the back is complete you will be making the lid
by using a similar process.
You
will be making the mummy case by using large sheets of corrugated
cardboard. First you cut out the back of the case, then the
sides. You will be attaching the sides to the back with a hot
glue gun. When the back is complete you will be making the lid
by using a similar process.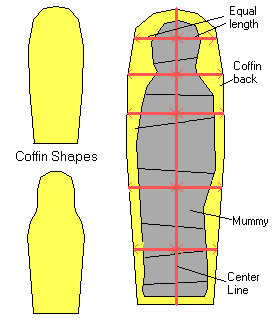 STEP
6: Now draw the shape of the left side of your mummy
case on the cardboard using your ruler for the straight sections.
Keep the line at least a half inch outside the mummy tracing.
When you reach the top, stop.
STEP
6: Now draw the shape of the left side of your mummy
case on the cardboard using your ruler for the straight sections.
Keep the line at least a half inch outside the mummy tracing.
When you reach the top, stop. STEP
8: Draw the right side of the coffin's edge following the dots
from head to foot. Try to make it match the shape of the line
on the left side.
STEP
8: Draw the right side of the coffin's edge following the dots
from head to foot. Try to make it match the shape of the line
on the left side.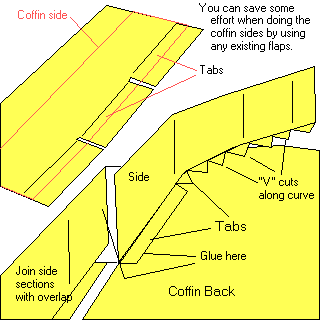 STEP
9: Measure out the sides of the coffin on the cardboard. Make
it as long as you can. Important: make sure the corrugations
on the side run up and down the short portion, not along the
length. If the corrugations do not run up and down the short
side it will be difficult to get the sides to follow the smooth
curve of the coffin back's edge when you start to glue it. Do
not worry if you do not have a sheet of cardboard that is long
enough to make a continuous side running around the whole coffin.
You will probably need to join several sections of sides together
to have enough. After you cut the side out you need to measure
off 2-1/2 inches from the edge and fold that over to become
the tab. Use a heavy straight object, like a board, to make
the bend. If the cardboard you are working with has flaps you
can use the existing bend rather than make your own. It does
not matter if the tabs are not continuous, but have some breaks
or slots.
STEP
9: Measure out the sides of the coffin on the cardboard. Make
it as long as you can. Important: make sure the corrugations
on the side run up and down the short portion, not along the
length. If the corrugations do not run up and down the short
side it will be difficult to get the sides to follow the smooth
curve of the coffin back's edge when you start to glue it. Do
not worry if you do not have a sheet of cardboard that is long
enough to make a continuous side running around the whole coffin.
You will probably need to join several sections of sides together
to have enough. After you cut the side out you need to measure
off 2-1/2 inches from the edge and fold that over to become
the tab. Use a heavy straight object, like a board, to make
the bend. If the cardboard you are working with has flaps you
can use the existing bend rather than make your own. It does
not matter if the tabs are not continuous, but have some breaks
or slots.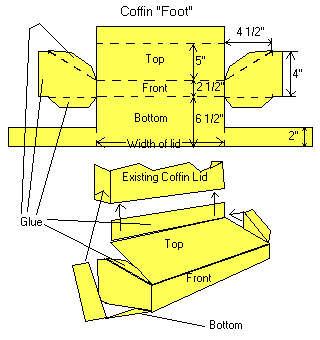 Making
the case's lid
Making
the case's lid
|
Related Links |
|
|